
The marriage of sourdough and pizza is a nod to the ancient traditions of Naples, where the alchemy of wild yeast and high heat created the world's most coveted crusts. For centuries, bakers relied on the natural fermentation of the air and flour, a process that not only developed a complex, tangy flavor profile but also made the bread easier on the stomach.
While traditional Neapolitan styles often favor a very long cold-ferment, the concept of a same day sourdough pizza dough is a modern adaptation for the home cook. It preserves the nutritional benefits—like the boosted bioavailability of minerals—while respecting the pace of a busy contemporary household.
This approach relies on the vitality of an active sourdough starter to do the heavy lifting quickly. By combining simple staples like 180 g water, lukewarm and a touch of extra-virgin olive oil, the dough achieves a structural integrity that supports heavy toppings while remaining airy and light. It is a bridge between the slow, reflective art of heritage baking and the immediate joy of a family meal.
Why You'll Love It
-
- Honestly, it's just such a relief to have that deep sourdough tang without waiting days for it to rise. It makes a Tuesday feel like a special occasion, you know?
-
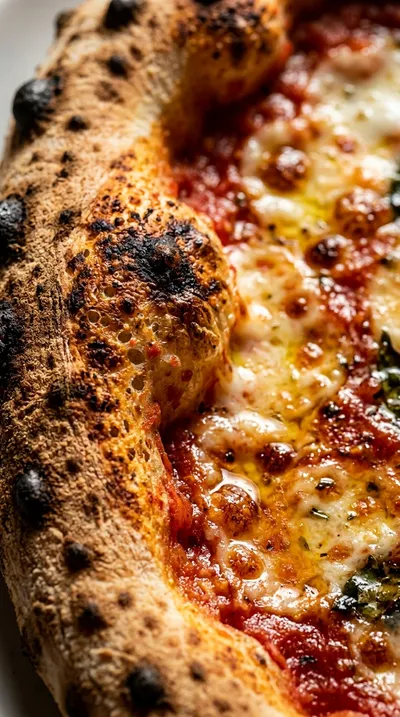
- The texture is just lovely—chewy in the center with those golden, crisp edges that make you want to eat the crust first.
-
- Well, look, it's actually quite simple to put together, so you don't have to be a professional baker to get a pizzeria-style finish at home.
-
- I remember when I first tried this, the smell of the bubbling cheese and toasted bread flour filled the whole house... just pure comfort.
"Honestly, I was skeptical about the speed, but the flavor is just wow. My kids actually asked for the 'sour bread' pizza again!"
Essential Ingredient Guide
- 240 g active sourdough starter (100 % hydration): This is the heart of the dough. Make sure it's bubbly and active, otherwise the rise might be a bit sluggish, ugh.
- 300 g bread flour (all‑purpose flour works): I prefer bread flour for that extra chew, but all-purpose is just fine if that's what's in the pantry. It gives the crust its sturdy structure.
- Cornmeal or semolina for dusting (optional): This is my little secret for that professional crunch. It keeps the dough from sticking and adds a wonderful, sandy texture to the bottom.
- 10 g salt (2 tsp): Don't skip this, dang, it really wakes up the flavors of the flour and starter. I mix it in a bit later to let the dough hydrate first.
- 1 Tbsp extra‑virgin olive oil: This adds a gentle richness and helps the dough feel supple under your hands. It also gives the crust a beautiful, golden glow.
- 1 tsp honey (optional, for caramelization): Just a tiny bit of sweetness to help the crust brown nicely in the oven. It's a subtle touch, but wow, it makes a difference.

Complete Cooking Process
-
Ingredient Readiness:
Start by whisking your active sourdough starter with lukewarm water and honey. Making sure the water is around 20 °C helps the yeast feel right at home and get moving.
-
Flavor Development:
The flavors really start to deepen during that 60-minute proof at room temperature. That's when the sourdough tang settles in and the dough puffs up beautifully.
-
Texture Control:
The autolyse period—that little 30-minute rest—is key. It hydrates the flour so you don't have to overwork the dough, keeping it light instead of tough.
-
Finishing Touches:
Before the pizza hits the stone, I like to stretch the edges a bit thicker. Then, just a little sauce, mozzarella, and your favorite toppings to finish it off.
-
Serving Timing:
Serve it immediately while the cheese is still bubbling. Honestly, slicing it right away helps keep that airy, artisan crust from collapsing.
-
Use a pizza stone or steel for a crispier base, though a preheated baking sheet works too.
-
Brush the edges with olive oil before baking to get a truly golden, crispier rim.
-
Let the divided dough balls rest for 15 minutes to relax the gluten before stretching.
-
Keep a pizza cutter ready for immediate slicing to maintain the crust's structure.
Pro Tips
Just take your time with the kneading, and your kitchen will smell like a dream.


Better For You Treats
I love that sourdough fermentation naturally lowers the glycemic index and makes minerals easier for our bodies to use. With 1 Tbsp extra‑virgin olive oil and a touch of honey, it's a more mindful way to enjoy a comforting slice.
Ways to Make it Your Own
You could try the Herbed Garlic‑Parmesan version by mixing in minced garlic and Parmesan during step 4. Or, if you're feeling fancy, toss some fresh spinach into the dough while kneading for a green, earthy twist.
Serving Suggestions
I always like to drizzle a bit of extra-virgin olive oil and scatter fresh basil leaves on top after it comes out of the oven. Pair it with a light green salad and some chilled sparkling water for a lovely, home-style meal.
Frequently Asked Questions
→ What if my dough isn't puffing up enough during the proof?
Don't worry, just give it another 15 or 20 minutes in a warm spot. Sourdough can be a bit moody depending on the temperature in your kitchen.
→ Can I use all-purpose flour instead of bread flour?
Yeah, you certainly can! It'll be a slightly softer crust, but it's still absolutely delicious.
→ How do I store the dough if I'm not ready to bake?
Just pop it in the refrigerator for up to 2 days, or wrap it tightly and freeze it for up to 3 months. It's so handy to have some ready to go.

Nutrition Facts
per serving
620
Calories
22g
Protein
72g
Carbs
18g
Fat
Taste Profile
A balanced tang from the sourdough paired with savory cheese and a hint of honey sweetness.
Ingredient Substitutions
Don't have an ingredient? Try these alternatives
Works well, though the crust may be slightly less chewy.
Provides similar caramelization and subtle sweetness.
Both work perfectly for preventing the dough from sticking.
Recipe Variations
Try these delicious twists on the original
Herbed Garlic‑Parmesan Crust
For a savory twist, sprinkle in some finely minced garlic and grated Parmesan during Step 4. It smells absolutely heavenly while baking.
Spinach & Feta Sourdough Pizza
Toss some fresh spinach right into the dough while kneading. Then, top with crumbled feta, sun-dried tomatoes, and fresh oregano for a Mediterranean feel.
Common Mistakes to Avoid
Learn from others' mistakes for perfect results
- Rushing the oven preheat, which leads to a soggy bottom crust.
- Skipping the 15-minute rest after shaping, making the dough snap back when stretching.
- Over-proofing the dough until it doubles, which can make it too airy and hard to handle.
Meal Prep & Storage
Make Ahead Tips
You can prepare the dough and keep it in the refrigerator for up to 2 days. Just let it come to room temperature before stretching.
Leftover Ideas
Fresh pizza keeps well in an airtight container for 2‑3 days. To get that crunch back, reheat it on a pre-heated stone or in a hot oven.
Perfect Pairings
Serve this with...
Cooking Timeline
Mixing and kneading the dough
Autolyse rest period
Adding salt and first room temperature proof
Dividing and final pre-proof rest
Shaping, topping, and baking


Same Day Sourdough Pizza Dough
There is something so comforting about the smell of fresh bread filling the kitchen. This same day sourdough pizza dough gives you that deep, artisan tang and a chewy crust without the long wait.
Timing
Prep Time
20 Minutes
Cook Time
12 Minutes
Total Time
80 Minutes
Recipe Details
Ingredients
Dough Ingredients
-
01
240 g active sourdough starter (100 % hydration)
-
02
300 g bread flour (all‑purpose flour works)
-
03
180 g water, lukewarm (about 20 °C)
-
04
10 g salt (2 tsp)
-
05
1 Tbsp extra‑virgin olive oil
-
06
1 tsp honey (optional, for caramelization)
For Dusting and Topping
-
01
Cornmeal or semolina for dusting (optional)
-
02
Pizza sauce, mozzarella, and desired toppings
Instructions
Start by whisking together your 240 g active sourdough starter, 180 g water, 1 tsp honey, and 1 Tbsp extra‑virgin olive oil in a large bowl. Just stir it until the mixture looks uniform and smooth.
Stir in the 300 g bread flour until a shaggy dough forms. Now, honestly, the best part is the kneading; do this by hand for 5‑7 minutes until it feels smooth and elastic under your palms.
Cover the dough with a clean towel or plastic wrap and let it autolyse for 30 minutes. This just gives the flour time to hydrate, which, wow, really lowers the kneading time later on.
Add the 10 g salt and mix it through the dough by folding and rolling. Just make sure it is fully incorporated into the dough.
Shape the dough into a ball and place it in a lightly oiled bowl. Cover it up and let it proof at room temperature (~22 °C) for 60 minutes. You're looking for it to be visibly puffed, though it doesn't need to double in size.
Turn the dough onto a lightly floured surface and punch it gently—it's a bit satisfying, really. Divide it into two equal portions and shape each into a tighter ball.
Cover those dough balls again and let them rest for another 15 minutes. This pre‑proof just relaxes the gluten so the dough doesn't fight you when you stretch it.
Preheat your oven to 260 °C (500 °F) with your pizza stone or steel inside for at least 30 minutes. You want that base screaming hot for a good crust.
Flatten each dough ball on parchment paper dusted with cornmeal or semolina. Stretch or roll it to how you like it, but leave a slightly thicker edge for that lovely crust.
Top with your sauce, cheese, and favorite toppings. Slide the pizza onto the pre‑heated stone using a peel and bake for 10‑12 minutes until the crust is golden‑brown and the cheese is bubbling away.
Notes & Tips
-
1
A pizza stone or steel is wonderful for a crispier base, but a preheated baking sheet works just fine if that's all you have.
-
2
If you want a crispier rim, try brushing the edges with a bit of olive oil before it goes in the oven.
-
3
Slicing immediately after baking helps maintain the structure of that lovely airy crust.

Tools You'll Need
-
1 large mixing bowl for combining ingredients
-
Measuring spoons for the honey, oil, and salt
-
Kitchen scale for precise flour and starter measurements
-
Spatula or dough scraper to handle the sticky dough
-
Clean kitchen towel or plastic wrap for covering the proofing dough
-
Pizza stone or steel for a professional heat base
-
Pizza peel or parchment paper to slide the pizza into the oven
-
Oven for baking
Must-Know Tips
-
Use a stone, A pizza stone or steel creates a much crispier base than a standard tray.
-
Pre-proofing, Letting the dough balls rest for 15 minutes relaxes the gluten for easier stretching.
-
Immediate slicing, Use a pizza cutter right away to keep the airy crust from collapsing.
Professional Secrets
-
The autolyse phase (Step 03) is a secret to reducing physical labor while improving dough texture.
-
Using honey provides a subtle sweetness that aids in better caramelization of the crust at high heat.
-
High-heat preheating of the stone (at least 30 mins) mimics a commercial deck oven for a superior bottom crust.
What readers are saying
Community reviews from home cooks like you
This exceeded my expectations. I really liked how the 240 g active sourdough starter (100 % hydration) and 300 g bread flour (all‑purpose flour works) came together. Will be making this regularly.
Perfect for a busy weeknight. I really liked how the 240 g active sourdough starter (100 % hydration) and 300 g bread flour (all‑purpose flour works) came together. Saving this for later.
This was a hit with my family. I really liked how the 240 g active sourdough starter (100 % hydration) and 300 g bread flour (all‑purpose flour works) came together. Will be making this regularly.
This was a hit with my family. I really liked how the 240 g active sourdough starter (100 % hydration) and 300 g bread flour (all‑purpose flour works) came together. I added a bit more seasoning next time. Will be making this regularly.
Absolutely loved this recipe! I really liked how the 240 g active sourdough starter (100 % hydration) and 300 g bread flour (all‑purpose flour works) came together. Thanks for sharing this one!
Good, but not amazing. The hydration) flavor was nice, but i swapped one ingredient and it still worked. I might try it again with some adjustments.
Can't believe how simple this was. I really liked how the 240 g active sourdough starter (100 % hydration) and 300 g bread flour (all‑purpose flour works) came together. Thanks for sharing this one!
This exceeded my expectations. I really liked how the 240 g active sourdough starter (100 % hydration) and 300 g bread flour (all‑purpose flour works) came together. Saving this for later.
Absolutely loved this recipe! I really liked how the 240 g active sourdough starter (100 % hydration) and 300 g bread flour (all‑purpose flour works) came together. Great addition to my recipe rotation.
Absolutely loved this recipe! I really liked how the 240 g active sourdough starter (100 % hydration) and 300 g bread flour (all‑purpose flour works) came together. Next time I'll double the sauce. Saving this for later.
Will definitely make this again. I really liked how the 240 g active sourdough starter (100 % hydration) and 300 g bread flour (all‑purpose flour works) came together. Will be making this regularly.
Will definitely make this again. I really liked how the 240 g active sourdough starter (100 % hydration) and 300 g bread flour (all‑purpose flour works) came together. Perfect as written.
Perfect for a busy weeknight. I really liked how the 240 g active sourdough starter (100 % hydration) and 300 g bread flour (all‑purpose flour works) came together. Will be making this regularly.
The flavors were spot on. I really liked how the 240 g active sourdough starter (100 % hydration) and 300 g bread flour (all‑purpose flour works) came together. I found it a bit sweet for my taste. Saving this for later.

Recipe by
Sofia RiveraExploring the world through food 🌍🍲 Rich flavors, exciting dishes, and endless culinary inspiration ✨
Get Delicious Recipes Weekly
Join 25,000+ home cooks getting our best recipes straight to their inbox.
Free forever • No spam • Unsubscribe anytime